Dekton DESIGN GUIDE
Product information
The actual usable slab surface is slightly less per side due to the bevelled perimeter

The actual usable slab surface is slightly less per side due to the bevelled perimeter
Length
3150mm +/-10mm
Width
1400mm +/-10mm
Thickness
8mm, 12mm and 20mm +/-1.5mm
Weight
8mm = 93kg per slab(21kg m2)
12mm = 141kg per slab(32kg m2)
20mm = 233kg per slab (53kg m2)
Dekton is an ultracompact surface that consists of a sophisticated blend of the raw materials used to produce the very latest in glass and porcelain as well as the highest quality quartz worktop surfaces. The natural raw materials give the Dekton its strength, but being made from natural materials, it also means there are some important factors that should be considered.
As the slabs are largely composed of natural minerals, each slab is unique, even though it will have the same common structure, colour and overall look for the series.
The raw quartz materials are screened to remove impurities and graded by colour and size before proceeding to manufacture. However, it is impossible to remove 100% of the irregularities in the colour of the quartz. This means that small black chips might appear in a lighter coloured material, or small white chips in a dark coloured material. This is not a flaw, but just a result of using natural materials.
There might be slight colour variations between each production batch of slabs. This can be evident when comparing a sample in the showroom, which may be several years old, and the actual slab what will be used for manufacturing the worktops, which is from a more recent batch.
A Sample only tells part of the story, below you can see the size of samples in relation to the size of the slab. While a sample gives a good idea of the look and feel of the slab, it is not a complete indicator of the overall effect of the full size of slab. We always recommend that the customer views larger images on the website, or inspects the slab prior to fabrication to ensure that it meets expectations.

When designing worktops, it is recommended that there are joins every change of direction in a worktop as L shape cut-outs should be avoided.

Maximum length of a piece with a sawn cutout in 20mm 2800mm
Maximum length of a piece with polished cutout in 20mm is 2500mm
Upstands are 20mm thick and maximum length 2500mm, Minimum height of upstand 50mm
A 5mm expansion gap is required with stone worktops against a wall, this is normally covered with upstands, tile or glass, but will be an issue if the customer requires nothing against the wall, to do less than the 4-5mm recommended will void any warranty so should be taken into consideration when designing.
Although these worktops can be cut as one piece from a slab, we do not recommend this as it is important to consider the risks of cracking that can happen after installation.
Cracking does not indicate a material fault or even a fault with the fabrication or installation. Often it may be the result of externally induced or mechanical stress on the worktops. The two most common sources are heat (thermal shock) causing expansion or contraction, and high load points. These could be the result of something that the consumer has done unknowingly or accidentally.
It is best to avoid this situation in the first place by using joins and avoiding L shape cut-outs.

Please take into account we operate to industry standard tolerances of +/-3mm, so a 5mm minimum overhang is always recommended, asking us to supply it flush, means when it is cut it could be -3mm overhang i.e. showing the door or carcase.
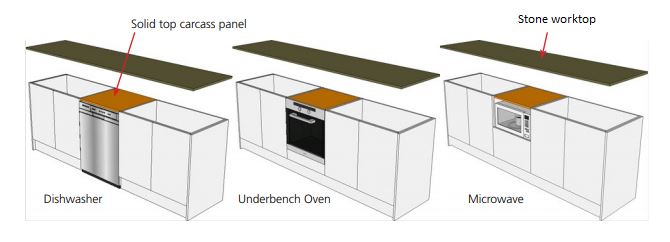
Appliances such as ovens, dishwashers, washing machines and microwaves can generate heat in a very confined area. To protect the worktops from this we do recommend that a solid top is installed above these appliances made from the same material as the cabinet carcasses.
This will provide both support and insulation for the worktops, also a heat defusing pad can be used.

Solid tops are not a replacement for vertical rails. A flat panel, although adds strength, does not negate the need for solid vertical rails in cabinets where there will be cutouts.
Ideally cabinets will have a solid timber vertical rail to provide maximum strength.
Draw cabinets should have a solid top as vertical rials are not practical.

Vertical rails over under bench ovens provide additional support, especially important when the cooktop coutout is above the oven.

Avoid having a hob located above drawer units, this may restrict the use of vertical rails and potentially weaken the support structure under the worktop.

Horizontal rails under a sink or hob cutout tend to have a large portion cutout. This leaves the support inadequate for the worktops. Keep in mind that the worktops also have a cutout for the appliance, resulting in a weak section of worktop without adequate support below (see image).
Therefore vertical timber rails or similar stronger, vertical support are always recommended.

For information on Dekton worktop overhangs please view this guide.
Cut-outs within worktops for sinks or hobs should always be supported to ensure the worktop is not bearing the direct weight of any applied heavy loading placed on the worktops.
For this reason, we recommend the use of vertical rails that will fully support the weight of the worktop and any additional heavy loads further placed on the worktop. Any rail support must not flex or sag regardless of span, which could place stress on the worktop material.

Horizontal rails are not recommended, the installation is dependant on the quality of structure and support that the worktops are being installed onto.

For carcases with large spans, it is essential that the rear and especially the front rail are constructed from strong materials that are rigid and will not flex under load. In these circumstances a double laminated, vinyl wrsapped, solid timber rail or one made from aluminium or steel may be necessary.

The maximum depth of Groove/Rebate to comply with warranty is as follows:
20mm = 5mm deep
12mm = 3mm deep
Please ensure you take this into account when ordered items to be placed into the material
Slabs must be installed on a rigid frame or base that cannot flex or bend. Cantilever islands should be constructed from a steel frame and must be capable of supporting the full weight of slabs negating any movement or sagging.

The following information must be considered when designing the incorporation of sinks, hobs etc into worktops. Cut-outs are usually creating in worktops for the installation of sinks, hobs and other accessories. Cut-outs must be prepared according to the instructions of the manufacturer of the item to be installed. A Minimum radius of 10mm is recommended for all internal corners in cut-outs (figure 1) the larger the radius the stronger the corner.

Consider the minimum recommended dimensions when designing cut outs for appliances and sinks.

If a cutout will leave front and back benchtop rail widths of less than 55mm, consideration should be given to making these rails from seperate pieces to avoid problems with cracking.
If less than 55mm from edge, then it is recommended that seperate rails be abutted to the end of the benchtop.

Sink Drainage grooves and recesses are often cut into the surface of the material when under mounted sinks are used. There are several fabrication considerations that need to be addressed.
Any square corners either in a sink, hob or other worktops are not covered under any warranty.
Note – the recommended edge profile for under mounted sink cut outs should be 5mm radius top and bottom edge, to minimise the risk of chipping or damage. The greater the profile the more durable the edge will be.
As standard we overhang the sink all around by 10mm, this means the silicone is out of sight, we recommend the minimum is 5mm overhang, but if a customers requires less than this they need to take into account cutting tolerances of +/- 2mm so if you for example ask for flush i.e. no overhang once it comes off the machine it could be -2mm overhang

Stone splashbacks offer low maintenance, easy to clean, grout free surface with continuity of worktop colour and are ideal behind sinks and hobs. In addition, they offer reduced lead times with the same day installation as the worktops.
Where can stone splashbacks be used?
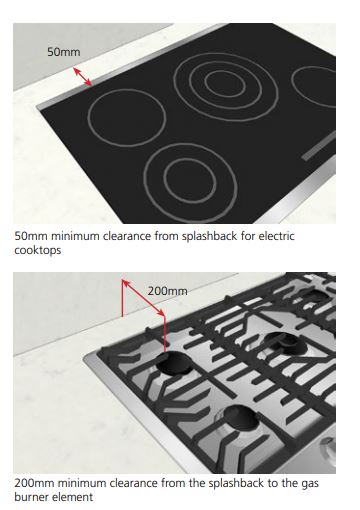
Electric cook tops (both freestanding or inset) and inductions tops
for both electric and induction we recommend a minimum 50mm clearance form the back edge of the hob to the stone splashback.
Gas cook tops (both freestandind or inset)
for has hobs a minimmum of 200 mm from the periphery of the gas burner to the stone splashback is recommended. When designing worktops check with the manufacturers recommended installation details as they may require more than our minimum, always follow the manufacturers installation instructions.

There are many edge profiles that can be achieved using stone worktops, and it is important to take the following factors into consideration.
All exposed edges should be cut then polished.
The top and bottom edges must have a minimum of a 3mm arris top and bottom but recommended 5mm pencil round top and bottom to reduce the chipping. The larger the radius of the edge the more resistant it is to chipping.
Examples of some of the edges available please visit the showroom to see all of them.

If you knock 2 hard materials together, on the leading edges there is a risk of chipping, this is not covered by the warranty, we advise to change the edge as discussed above to reduce the risk of chipping.
Natural stone surfaces are installed on top of cabinets and are not fixed to the wall. Before installing the worktops, ensure that cabinets are complete, stable, level and suitable for bearing the weight of the surface and any other heavy applied loading including sinks filled.
Stone worktops must be supported on strong, weight supporting perimeter frame or on a full solid carcase.
Ensure the worktops are supported sufficiently in areas of joins, cut-outs and over spaces for appliances such as dishwashers, ovens, washing machines etc.

For cut outs longer than 600mm provide side to side support beams under the surface.
Provide support under all worktop joints.
Attach a board between the cabinet tops on both sides of under worktop appliances that generate heat.
For surfaces of 12mm or 20mm if extra reinforcement of the cabinets or the surface is considered necessary, incorporate a full carcass panel in the top of the cabinets.

Once installation is complete, the installer will ask you to check the worktops all over, please be careful about the first 24 hours as glues and silicones take time to dry, do not use the sink in this time.
If further works are required in your kitchen for example appliance installation, decorating etc please ensure you protect your worktops by covering them once the silicones and glues have dried with corrugated cardboard or another protective material.
Please ensure the worktops are not used as a work bench, step or standing platform, and any person using strong solvents or adhesives must show due care.
Shown here some examples of kitchens after the worktops have been signed off, on each occasion customer had scratches and damage to the worktops caused by trades working after the kitchen installation

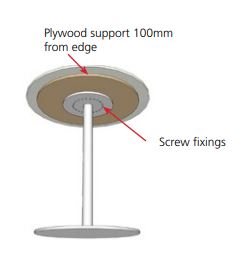
When installing a stone surface as a freestanding table top or where a larger overhang, the base must fully support the weight of the stone table top. All edges should be arrised to 3mm top and bottom to reduce the risk of damage from chairs etc.
The stone should be bonded to the substrate with epoxy or neutral cure silicone and then screw fixed to substrate.

Natural stone is an ideal surface for furniture, large benches etc. When using stone in these applications, it is important that the perimeter and internal supports do not sag or move from the weight of the stone or any additional applied surface loading.

Stone can be used in several ways to create a vanity unit.
Where the material itself forms the receptacle that will hold water or where water is running directly onto the surface of the Stone. Boiling water must be avoided due to the risk of thermal shock.

Installing large bowls into utility and increasingly kitchens requires additional consideration, as for example above is a dual sink which requires a wide cabinet to accommodate it.
The total capacity is 90L with each litre of water weighing 1kg, so it could potentially have a weight of approximately 90kg if both sinks were filled with water. If there are two bowls, then we recommend adding a rail between the bowls.
This is equivalent to a person standing on the top in an area with a large cut-out. Unless the cabinets are reinforced and can adequately support this weight, then there is a high risk of a worktop failure.

Where these appliances are installed below the worktops, care needs to be taken with providing additional support.
It is advisable that a vertical support panel is placed between the appliances and either a support panel or cabinet be placed either side this will ensure that the tops have adequate support.
The Other consideration is with the heat generated by these appliances, especially the dryer. Some of these exhaust through the front while others through the back, some may also need to be ducted.
If required a panel/ heat defuse may need to be installed below the tops to protect them from heat.

Stone surfaces can tolerate moderately hot surfaces for brief periods of time. Prolonged exposure will result in discolouring or other types of damage.
Do not expose stone to excessive heat, the rule of thumb is that if cookware is too hot to hold then don’t place it directly on your stone worktop use a trivet.

Heat can cause a worktop to expand rapidly but in a very localised area while the rest of the worktop remains cold. This thermal expansion is opposed by the cold, non-expanding adjacent material as well as any adhesive used to fix the worktops.
A pot placed directly on a worktop creates two issues. Firstly there will be a sudden change in temperature of the worktop causing thermal shock, which in turn causes cracking. Secondly the heat will cause the resin used to hold the quartz powder together to begin to melt, this is what causes the rings shown in the pictures. This may not cause the top to crack to start with but over time it will undermind the structure of the top and it will then crack.

For information on the care and maintenance of your Dekton worktop please view this guide.